How to Install Python on Windows – 8 Easy Steps
In this post, we will be looking for Step by Step guide on how to install python on Windows.
Python is a high-level object-oriented language programming language. It is one of the fastest-growing and popular due to its simple programming syntax, and vast libraries.
Python is also considered to be the best programming language in the fields of Artificial Intelligence, Machine Learning, Deep Learning, Web Development, etc.
Python is invented by Guido van Rossum and was first released in 1991. It is an open-source programming language which means it is available for all platforms and can be installed freely on windows, Linux, and Mac operating systems easily.
Read also: Top 14 Applications of Python
Table of Contents
How to install Python on Windows
Python is pre-installed in Linux distribution. In Mac operating system Python2 version which is an older version is pre-installed. And in Windows operating system Python is installed by following a few easy steps.
Steps to Install Python on Windows are:
- Visit Official Python Website
- Select the version of Python
- Download Python Executable Installer
- Run the Setup of Python Installer
- Check Python is Install
- Check Pip is Install
- Install Virtual Environment
- Install IDE or code editor for Python
All the above steps are explained in detail below.
Step1- Visit Official Python Website
Python is open-source and can be downloaded by visiting the official website of the Python Organization Website. This Website is of Python Software Foundation which is a non-profitable organization that manages and directs the resources of the Python programming language.
Step2- Select Version of Python
Several years ago, there was a big update of Python which splits Python into two main versions called Python2(older version) and Python3.
Python version 3 is not backwardly compatible with Python version 2. Hence there are many libraries of Python3 that are not supported by the Python2 version. And many older libraries created for the Python2 version are not forward compatible, hence not supported by the Python3 version.
If you are working on the older projects which were coded in the Python2 version you can download the latest release of Python 2.7.
And if you are starting your project from scratch or downloading python for learning purposes I recommended you download the Python3 latest version.
Step3- Download Python Executable Installer
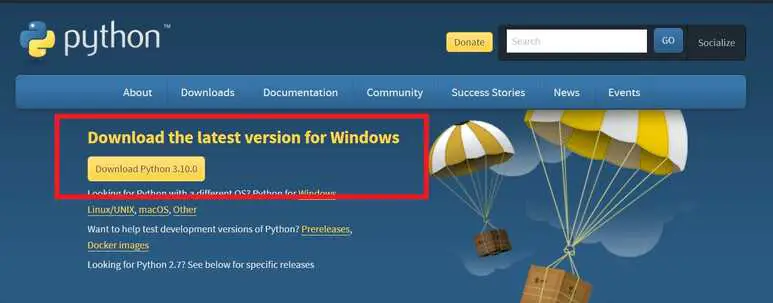
If you want to download the latest version of python you can visit the link and download it by clicking the button marked in red in the below image.
If you want to download the specific older version for windows you can visit here to do so. A web page with a list of the version that can be downloaded appears which is given below.
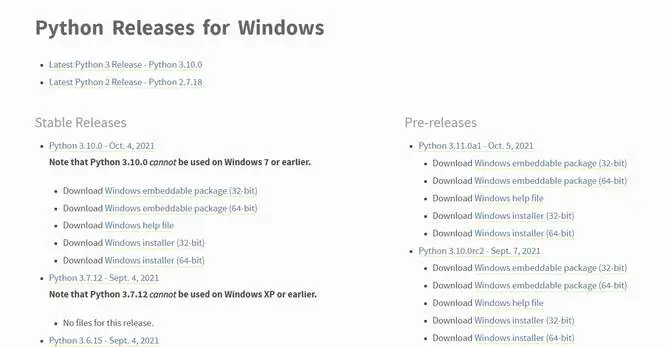
To download on windows click on the link with the text of Windows Installer. Download the Python Installer based on your system processor i.e. 32bit or 64bit.
To check the type of processor just open My Computer, right-click on the white space on the same My Computer window and go to properties.
Check whether a specific version is compatible with your operating system
Step4- Run the Setup of Python Installer
Once you download the Python Executable Installer, open the downloads folder and double click on the installer to run the setup. The next dialogue box that appears is given below.
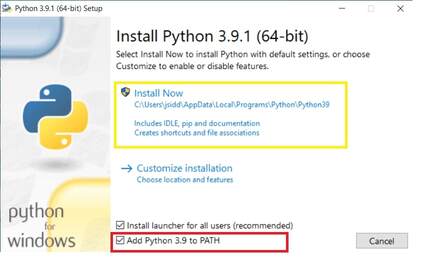
Before clicking Install Now make sure you have ticked Install launcher for all users and Add Python to Path as shown in the above image.
The “Add Python to Path” option is given in new versions, if you install the older version, you may not find this option.
After Clicking Install Now it will install python on your windows system and generate the next dialog box like the image given below.
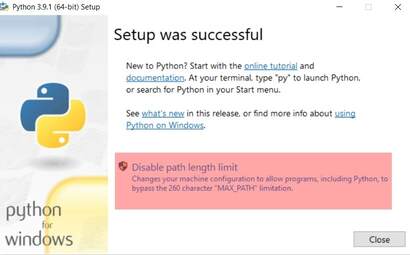
This gives us a message that the Python installation setup is successfully completed. Before closing the dialogue setup completion dialogue box, select the Disable path length limit, it is optional but I recommended it.
Disable path length limit means it helps to bypass the 260 character max path length limitation.
In simple words, Disable Path Length Limit means that if Python is installed somewhere on your system which has a path length greater than 260 characters, it doesn’t work from the Environmental Path variable. Hence I recommend you disable the limit. It’s optional but disabling the path length limit will not hurt you.
After this step, python should be installed on your windows system.
Step5- Check Python is Install
To check python is installed, you can run python shell on windows terminal.
Steps to run Python from Windows Command Prompt are:
- Click Start
- Search for “Command Prompt”
- Open Command Prompt
- Write “python” and Press “Enter”
If Python is properly installed, the Python shell is open on your Windows Command Prompt as shown in the image below. This means Python is Successfully Installed on Windows Machine.

Else you will get an error of ‘python’ is not recognized as an internal or external command.
If you have installed Python but still this error occurs only on Window command Prompt this means you have not added python to Path of Environmental variable. If it works smoothly you can move on to next step.
Step6- Check Pip is Install
Pip is a package manager for Python. That means Pip is a tool that is used to install and manage additional libraries that are not distributed with the standard library.
To check whether PIP is installed on your windows system just type “pip -V” in your windows command prompt.
If Pip is installed on your system it will return you the version of pip with the file location where pip is installed.

Step7- Install Virtual Environment
Now we have Python and Pip install, you can install Virtualenv (Virtual Environment), it is Optional but I recommend to install it.
What is Virtualenv?
When you installed standard libraries of python is installed for the entire system. If you want to specific modify a library for a specific project it affects other projects as well. To avoid this we can use the Virtual Environment package.
Virtual Environment puts a working copy of Python that is isolated within our project folder and also allows us to work according to project need without affecting the other projects.
Steps to install Virtual Environment:
- Click start and Open “Command Prompt“
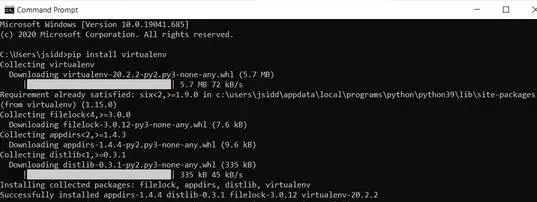
- Type “pip install virtualenv” and Press “Enter“
This command will install the virtual environment in your windows system.
Step8- Install IDE for Python
Integrated Development Environment or IDE enables the programmer for writing a program with features like syntax highlighting, executing, and debugging the program from a single application.
When you have a normal text editor you cannot run or debug a program in one click. IDE makes these tasks simple easy.
By default, python comes with an IDE called IDLE. As a beginner, IDLE is very useful. For creating projects you can install ide such as Pycharm, Visual Studio, etc.
After this step, we have completed the installation process of Python on windows with its necessary packages and you are ready to code.
Where Python is Installed on windows?
Sometimes we need the path of the python application, where is python on windows? There are 3 ways to get where Python is installed on Windows
- Using the File System
- Using Start Menu
- Using Windows Command Prompt
Using the File System
Directory where python is installed on Windows is:
Open C Drive –> Users –> Logged in user –> AppData –>Local –> Programs –> Python –> Folder with Python version–> Python Application
AppData folder is a hidden folder, to make AppData visible you have to Click on view option present at the top–left of the window(in Ribbon) and select Hidden items. AppData Folder will be visible now.
Using this method you will get the path of Python application as well the path of python libraries stored in windows.
Using the Start Menu
Steps of getting Where Python is installed on windows using the start menu as follow:
- Click Start–> Search for “Python“
- Right-click on Python Application –> Open file location
This will take to the file location of the shortcut of the Python application and not the actual file location.
Using Windows Command Prompt
Steps of getting Where Python is installed on Windows using the command prompt as follow:
- Open Windows Command Prompt
- Type “where python“
This command gives both the path of the shortcut and the actual path of the Python application. To get the idea to have a look at the screenshot.

If you get to know the Path of the python application using the file system it will be better for you because not just the python application path but you will also get to know where the libraries and scripts of Python are stored on windows
Conclusion
In this post, we have discussed in detail how to install Python on Windows operating systems
Be careful of the version of Python you are installing for your operating system. Install the version of python that is compatible with your system.
Install PIP to install other packages and dependencies. Also, install Virtual Environment to work with multiple projects at one time.
Cheers.!


